Sound Recording
In my forty plus years of making films, television shows and commercials, I have found more bad soundmen than any other craft. You even hear poor sound on major motion pictures. Bad sound is worse than bad picture. If the picture is a little soft or framed poorly, you can still follow what is happening. If the sound is unintelligible, you’ve lost your audience completely. However, getting good sound is not all that difficult.
- Pick the right microphone for the scene taking into consideration the ambient noise.
- Place the microphone the appropriate distance to get the right audio perspective.
- Play back each take to make sure it was recorded properly.
- Don’t trust your sound man to decide if the audio is “good enough”.
- There is very little that can be done in post to fix poor sound quality.
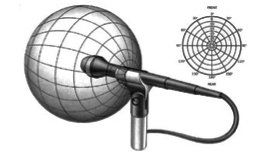
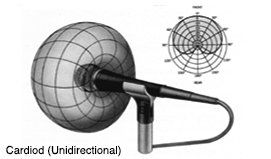
Cardioid microphones are designed to pick up the sound in front of the microphone and reject sound coming from the sides and back. That is why these microphones are also referred to as Unidirectional. Handheld Cardioid microphones are ideal for use by reporters and during interviews.
For the ultimate ambient noise rejection, soundmen use Shot Gun microphones. They are also called Super Cardioid, Hyper-Cardioid or Shotgun microphones. They are usually attached to a boom pole that is held over the heads of the actors out of camera range. They are almost exclusively used for recording dialogue. The Sennheiser MKH-416 is the most popular shotgun microphone.

Perspective: Use your brain. Get it right.
Every microphone has an ideal pickup range. A lavaliere microphone is design to be mounted chest level less than one foot from the talent. A shotgun microphone is designed to get optimum sound from about 2 to 4 feet. Generally speaking, the closer the shot, the closer the microphone should be to the person being recorded.
If you shoot a wide shot and use lavaliere microphones on the talent, the audio will have too little presence to sound natural. Use a shotgun just out of camera range. Conversely, it you are in a close up shot of two lovers speaking to each other intimately and you use a shotgun microphone from six feet away, you will ruin the scene because the audio won’t have the intimacy of the scene requires.
Sometimes you need to microphone the talent two ways. For example, in a medium shot, I like the talent to be wearing lavaliere -microphones which I record on channel 1. On channel 2, I record the audio from a shotgun microphone. That way I can mix them together to get just the right amount of presence.
But wait, it get’s better! Generally speaking all scenes should start with a wide shot and be moving closer and closer until you get to the climax or end of the scene. So by using both lavaliere and shotgun microphones you can alter the mix in post to get the precise presence you require. When the scene is in a wide shot you will be using the sound from the shotgun microphone. As the scene moves into a medium shot, you will use both the shotgun and the lavaliere microphone to get the right presence. At the end of the shot, when you are in close, you will be using the sound from the lavaliere microphones (or from the shotgun if it has moved in close on the actors.
Echo is not your friend
It’s real simple. You can add echo in post-production. You cannot get rid of it. High levels of echo render most audio unintelligible. However, if you are shooting a scene that is taking place in a large marble room, lack of echo would be unnatural. Even so, you should do everything possible to reduce the echo to a minimum.
Guess what? There is no echo outside (unless you are a canyon or some weird surrounding). So if you are shooting indoors against a green screen that will have the background replaced by an exterior image or a small room, you better find everyway possible to eliminate echo. Invest in a lot of furniture blankets!
Audio Recording Levels
Before you start recording, run a sound test and watch the meters on the camera to insure that they are not low and not too high. To low will result in noise and hiss. Too high results in audio distortion. If you are using an audio mixer, monitor the levels at both the mixer and on the camera.
Summary
- Know how to choose the appropriate microphone for the content being shot.
- Put the microphone in the right place to get the right perspective
- Watch out for echo
- Monitor your audio recording levels
There you have it. 42 years of my experience nicely wrapped up into just a few paragraphs. Follow my advice. Don’t let yourself be a victim to the bad sound boogie.
Recent Posts